New SmartThings integration (2023)
-
As you may have noticed, SmartThings discontinued all Groovy based integrations, so the old TRIGGERcmd integration stopped working.
Now there's a new TRIGGERcmd SmartThings integration. Follow these instructions to set it up:
- Login at https://smartthings.developer.samsung.com/workspace/projects
- Click the NEW PROJECT button

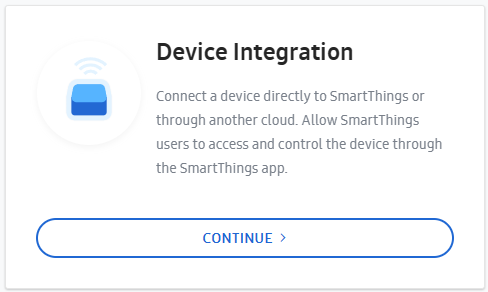
- Click CONTINUE under Device Integration
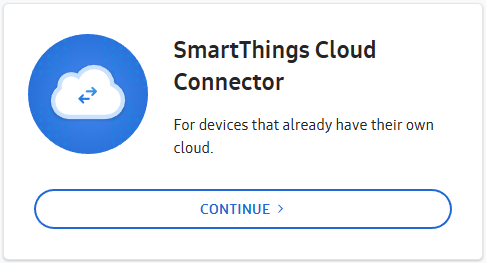
- Click CONTINUE under SmartThings Cloud Connector
- Name the project and click CREATE PROJECT

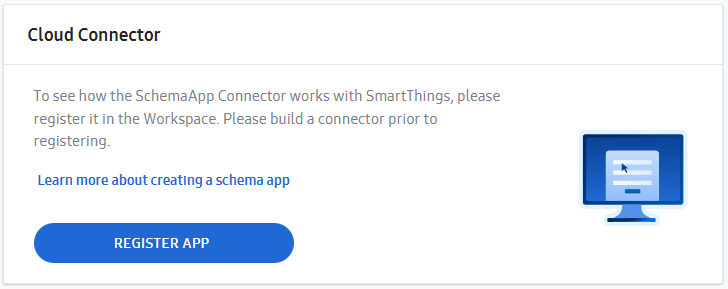
- Click REGISTER APP
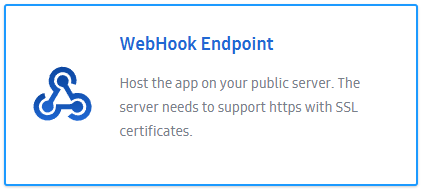
- Click WebHook Endpoint
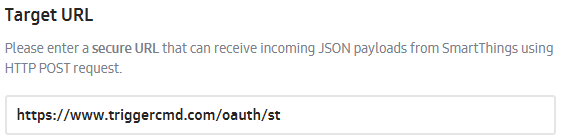
- Enter this for the Target URL: https://www.triggercmd.com/oauth/st
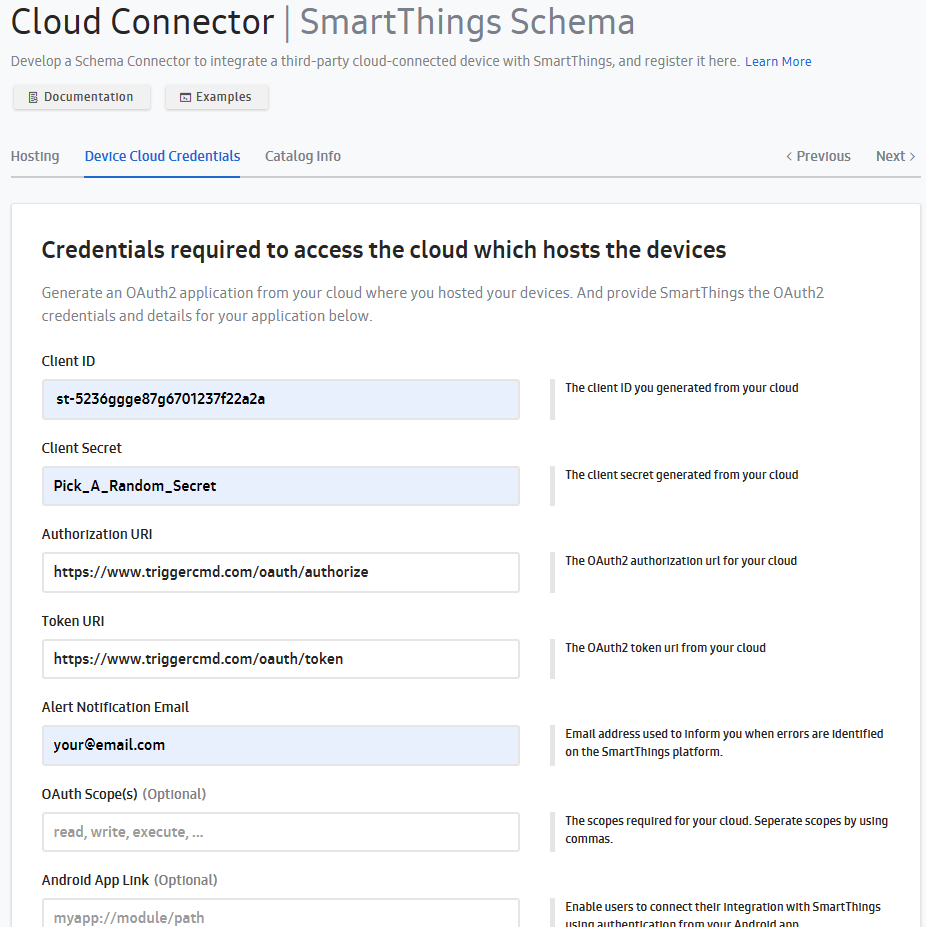
- Copy your Client ID (it starts with st-...) from your profile page under "SmartThings Device Cloud Credentials Client ID" and paste it into the Client ID field.
- Choose a random secret and paste that into both the Client Secret field AND the "SmartThings Device Cloud Credentials Client Secret" field on your profile page.
- Fill in Authorization URI with: https://www.triggercmd.com/oauth/authorize
- Fill in Token URI with: https://www.triggercmd.com/oauth/token
- Fill in Alert Notification Email with your own email address.
- When it looks like this, click NEXT:
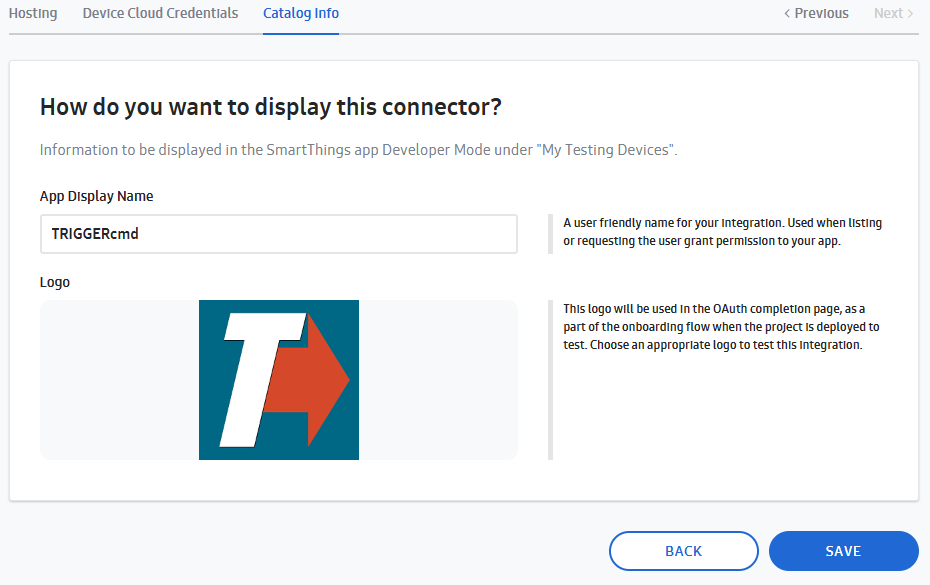
- Fill in the App Display Name and upload this image and click SAVE.
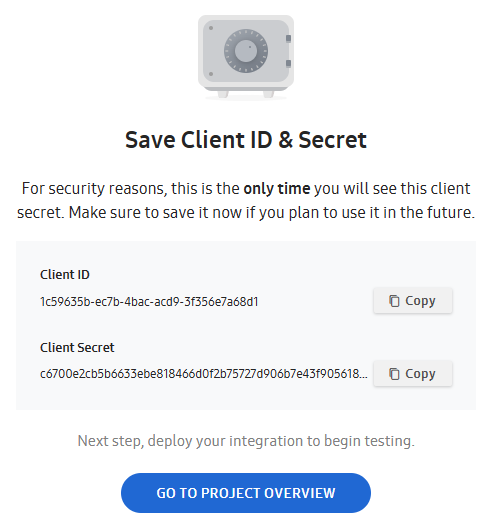
- Copy and paste these values into the SmartThings App Credentials Client ID and SmartThings App Credentials Client Secret fields on your profile page before you click GO TO PROJECT OVERVIEW
- Click DEPLOY TO TEST

- Open the SmartThings app on your phone.
- Go to the Dashboard>Settings>About SmartThings
- Press “About SmartThings” for 5 seconds.
- Now press “Developer Mode” to enable it.
- Close and open the SmartThings app.
- Tap the + in the upper-right, then tap Add device.
- Select Partner devices
- Scroll down to the bottom and tap My Testing Devices
- Tap TRIGGERcmd
- Log into TRIGGERcmd (if necessary)
- Tap Allow
- You're done!
It will create a virtual switch for each command with the Voice field filled in, just like the Alexa and Google Assistant integrations.
Please note, if you've linked SmartThings to Alexa or Google Assistant it will create an Alexa device for each SmartThings device, so you will get two devices for each command if you also have TRIGGERcmd linked directly to Alexa or Google Assistant.
If you're going to use this SmartThings integration, you'll want to unlink TRIGGERcmd from Alexa and Google Assistant to avoid the duplicate Alexa or Google devices.
It should work like this:
TRIGGERcmd -> SmartThings -> Alexa / Google AssistantRussell VanderMey
-
 R Russ referenced this topic on
-
R Russ referenced this topic on
-
R Russ referenced this topic on
-
R Russ referenced this topic on
-
D David Hess referenced this topic on
-
R Russ pinned this topic on
-
With the new Smartthings Integration (2023), I have found that the device type in Google Home is set to Light when linked to Smartthings. In GH I am able to change the Device Type when GH is linked to TRIGGERcmd but with the GH-ST link I am not and have to accept the default which then GH groups as a Light.
Connected through: SmartThings
Manufacturer: TRIGGERcmd
Name from SmartThings: Stair Light
Device type: LightConnected through: TRIGGERcmd Smart Home
Manufacturer: TRIGGERcmd
Name from TRIGGERcmd Smart Home: Stair Light
Device type: SwitchI'm not sure which method of integration works best for me, ST or GH. I may have a special case, not all of my Tcmd devices are lights. Since GH defaults ST-Tcmd Device Types to Light it groups them into lights. I now have duplicates one identified as a Switch (GH-Tcmd) the other as a Light (ST-Tcmd). The reason for the ST-Tcmd is that I use ActionTiles.com which allows me to create display panels using only ST devices. So if I want Tcmd devices in my ActionTiles panels I have to integrate Tcmd with ST.
@Russ said in TriggerCMD Commands are assigned device type "light"?
-
@djsweeneyiii, I'm familiar with ActionTiles. I always meant to setup a tablet with my ActionTiles panel but never did (yet).
What problem would you have if you un-linked TRIGGERcmd from GH and just used the ST devices with device type Light?
I could see if there's a way to make the ST devices switches in GH instead of lights if that would help.
-
@Russ Not all of my Tcmd devices are Lights, I have several devices that are switches. Everything from ST-Tcmd is defined as a light so my switches get grouped with the GH lights. When I execute a GH voice command for lights it will also execute my switches.
This is a similar issue @Rancor had.I don't know if GH-Tcmd devices will show up in ActionTiles because the devices do not show in ST.
-
@Russ I am slowly moving away from my Tcmd-X10 system. The New ST integration has prolonged my efforts, since the integration works so well. The only issue is that I cannot get the X10-switch status if I manually operate the switch. Operating the switch via Voice commands or ActionTiles reflects the actual state of the X10 switch.
-
@djsweeneyiii, I see, so it sounds like it would be better if the ST devices were switches instead of lights, or even better if you could configure some as lights and some as switches like you can with the GH TRIGGERcmd devices.
-
@Russ Yes. It looks like GH will default Switch Device Type to Lights; Light(Switch), but I am able to override this type in GH.
-
@Russ said in New SmartThings integration (2023):
Hello,
I am new in TRIGGERcmd, and need some clarification.
I did the install TRIGGERcmd on IFTTT and works perfectly.
Now Id like to integrate it in Smartthings. I did install it according to your recommendation, and update my Profile as well as smartthing in developer mode. When adding a device, I can see the option "Mytesting devices", and then "My setup APP" and "Mydevices" but when clicking on the Devices, I see only the 2 basic app: Calculator , Notepad, and none of my own app.any ideas ?
Thanks
Eric
-
@Garcia, do you see only Calculator and Notepad listed on this Smart Home Voice Commands page too? If so, you probably haven't given your other commands a voice word yet, so you won't see them in SmartThing either.
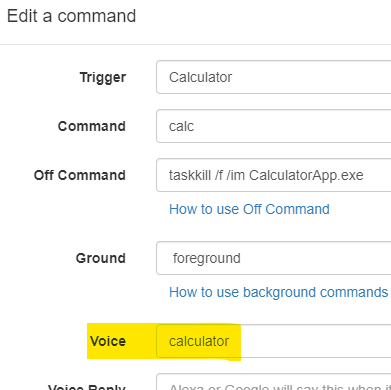
If you fill that Voice field in, your commands should show up because the SmartThings integration uses the same logic as the Alexa and Google Assistant integrations for choosing which devices to create.
-
@Russ Thanks a lot. It works now.
-
This post is deleted! -
@Russ At the step 27, I receive this message on my SmartThings app:
Access_token_request_failed….
What I did wrong?
-
Thanks for the good work.
Unfortunately, in the SmartThings app, when I add device, under Partner devices/My Testing Devices, I see :-
My setup apps
TRIGGERcmd
My devices
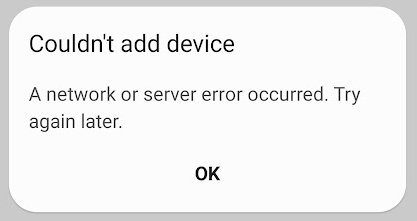
TRIGGERcmdIf I tap on either of these, I get :
Couldn't add device
A network or server error occurred. Try again laterAt least one of my commands has a voice field
I've created the project three times now to carefully check the entries.
Is there a way to get further diagnostics?
-
@pjthaut-gmail-co, I might see the problem.
None of your computers have a voice word associated.
For a command to get a SmartThings device (or Alexa device for that matter), the computer needs a voice word or the computer must be your default computer.
You can set your default computer in your profile.
One way to confirm what commands will get a device created is look at your Smart Home Voice Commands page. That page only lists the commands that are setup for voice activation. Only those commands will get a SmartThings device created.
If that's not the problem, please send me some screenshots of your config via the forum chat. I might be able to spot the issue.
-
-
@Sylvain-Boissé, did you ever get it working? Sorry for the late reply.
EDIT: Nevermind - I see in our chat that you got it working.
-
@pjthaut-gmail-co, I'm seeing that error too now. As soon as I tap "TRIGGERcmd" under My Testing Devices I see this error:
I didn't change anything, so I think the Samsung SmartThings system changed somehow.
I found that the TRIGGERcmd servers don't receive any request when I tap the "TRIGGERcmd".
I'll work on it and let you know what I find.
-
Re network error. It the SmartThings app version. 1.8.01.22 works. Previous versions available on apkpure fail to go into developer mode because of file permissions that can't be set. I've not tried 1.8.01.44 . Another Android device running the latest version now shows the devices.
-
Thanks you @pjthaut-gmail-co. I have SmartThings version 1.8.05.24 on my Samsung S20 phone and I get the error. I'll try some older versions. If that works for me too, I'll report this to Samsung SmartThings support.
EDIT: I also found that it works if I use version 1.8.01.22 of the SmartThings app.
-
I got a reply from Samsung SmartThings:
Hi Russell
Thank you for contacting SmartThings Developer Support.
We were able to reproduce the issue also in the 1.8.05.24, we will create a report as soon as we have updated I will inform you.Russell VanderMey
-
@Russ nice, waiting for news
